Create Local Yum Repository In Linux From ISO Image

 A local YUM repository in Linux is a collection of RPM (Red Hat Package Manager) packages stored on a local server or file system. YUM (Yellowdog Updater, Modified) is a package management tool commonly used in Red Hat-based Linux distributions like CentOS, Fedora, and Red Hat Enterprise Linux. It simplifies the process of installing, updating, and managing software packages on a Linux system. In this we'll try to create one.

Steps to follow:

  • Mount the iso image in virtual machine.
  • Install vsftpd rpm from the iso Packages.
  • Copy the packages from iso to /var/ftp/pub/Packages/
  • Install createrepo .rpm  from packages and Create repo in location /var/ftp/pub/
  • Create new repo file in location /etc/yum.repos.d/{any_name.repo} and add entry
  • Check and start the vsftpd and Clean & update the yum.

1. Mount the iso image in virtual machine.

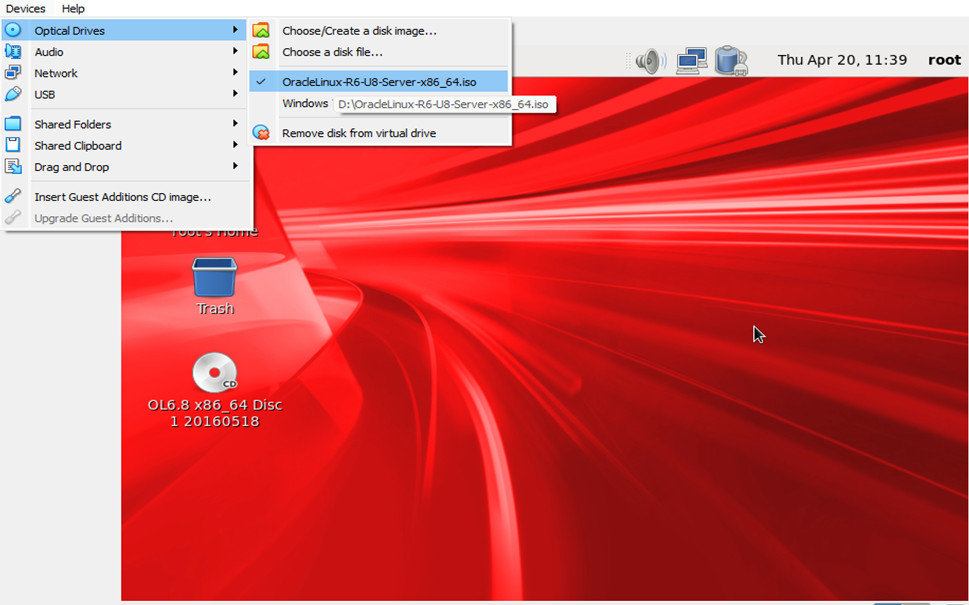
In the virtual machine select iso image file option in devices. It will be mounted and you can see the icon on the desktop screen.
Local Yum Repository

Let’s connect to the virtual machine through Putty or Mobaxterm or you can open terminal inside the virtual machine as per your convenience. I personally prefer Mobaxterm.

2. Install vsftpd rpm from the iso Packages.

Local Yum Repository

Sometimes it is in location /run/media/root/

Install the vsftpd .rpm in iso Packages location. Just type rpm -ivh vsftpd[Press tab] it will take the full name automatically.

Local Yum Repository

When this rpm is installed it will create a blank directory named pub  in /var/ftp/pub

3. Copy the Packages from iso to /var/ftp/pub/Packages/

Local Yum Repository

Type cp -r /media/OL[press tab]/Packages/ /var/ftp/pub/
As the name is complex of iso image file so pressing the tab button will take name automatically.
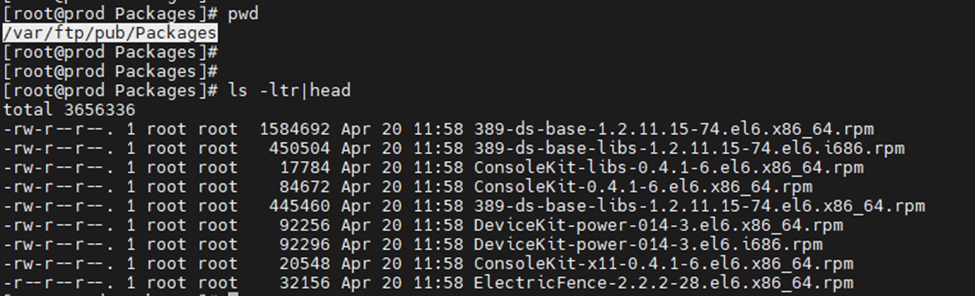
All the packages have been copied to the location we mentioned i.e. /var/ftp/pub/
Local Yum Repository

4. Install createrepo .rpm  from packages and Create repo in location /var/ftp/pub/
Local Yum Repository

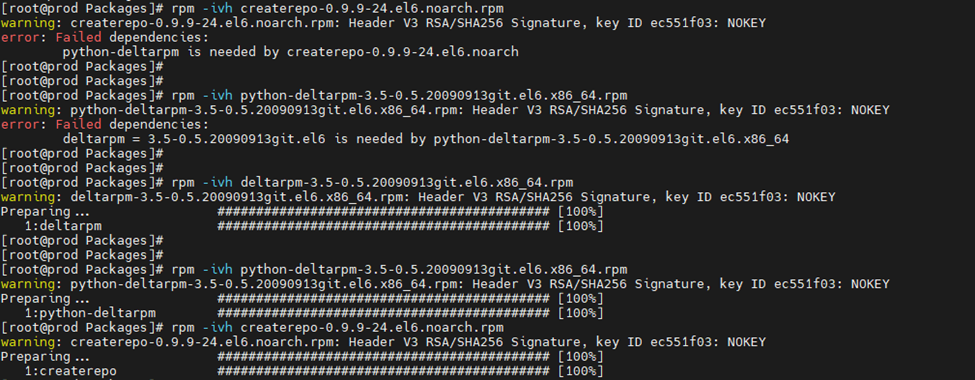
As you can see, when I tried to install createrepo .rpm from Packages directory it throws an error of dependency that means for installing this rpm we need to install another rpm which is mentioned in the error i.e. pyhton-deltarpm and for python it showed dependency of deltarpm.

So, I first installed the deltarpm then python-deltarpm and last createrepo.

Type the name of rpm and press tab it will take the full name automatically no need to type the whole thing.
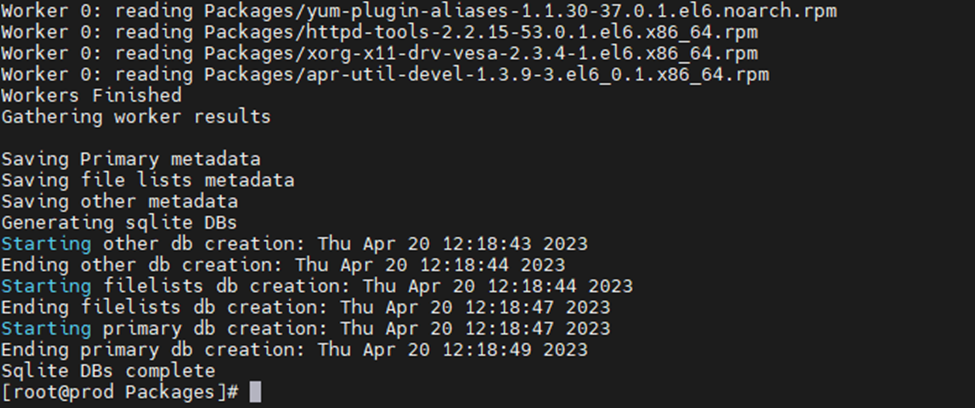
Now we will create a new repo with command: createrepo -v /var/ftp/pub/

Below is the output:

Local Yum Repository

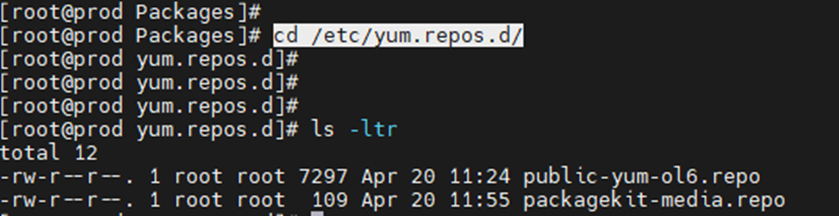
5. Create new repo file in location /etc/yum.repos.d/{any_name.repo} and add entry
Local Yum Repository

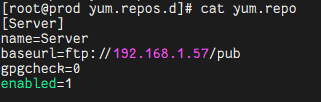
Here, we will create a new repo file with any name and add entry. I am using yum.repo here. In baseurl you need to put your system IP address.

[Server]
name=Server
baseurl=ftp://192.168.1.57/pub
gpgcheck=0
enabled=1
Local Yum Repository

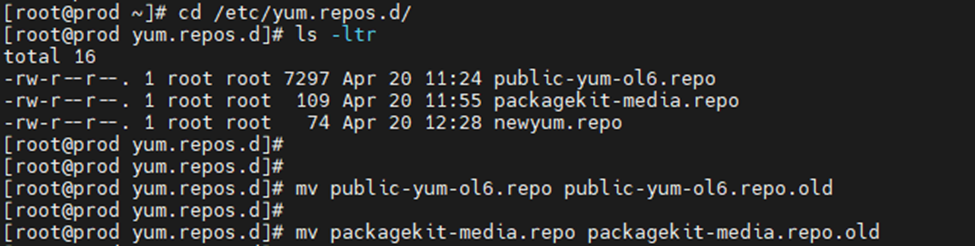
Note: You must rename the other files to .old except yum.repo because we will be using this.
Local Yum Repository

6. Check and start the vsftpd and Clean & update the yum.

/etc/init.d/vsftpd status
/etc/init.d/vsftpd start

#{OR some Linux system support systemctl}#

systemctl start vsftpd
systemctl status vsftpd


systemctl enable vsftpd

or

Chkconfig vsftpd on


Yum clean all
Yum update

VSFTPD started and its service will auto restart whenever we boot the system.

Local Yum Repository

Yum cleaned and updated.

Local Yum Repository

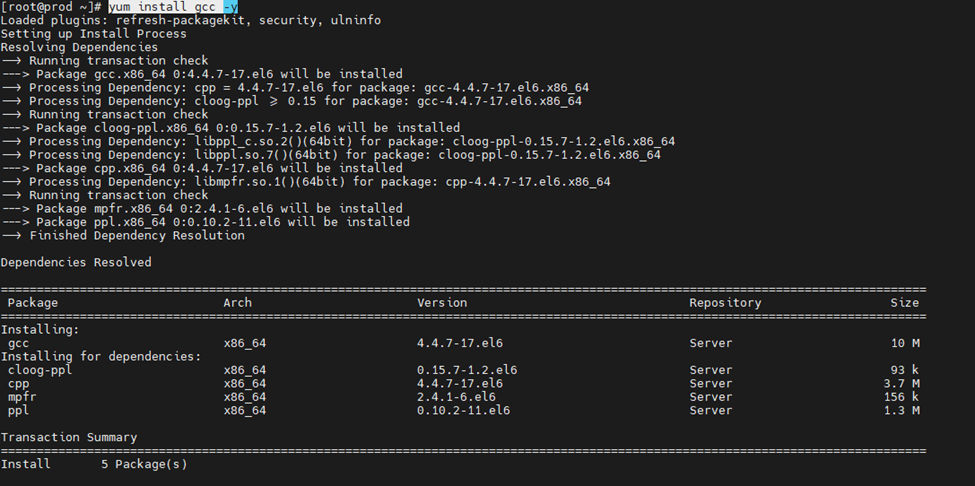
Now, we will try to install some packages that are required in oracle prerequisites installation. The benefit of yum is that it will install the dependent rpm’s automatically. We can use this yum repository to install rpm in other systems. We just need to copy the yum.repo file to different machine /etc/yum.repos.d/ directory.

As, you can see I tried installing gcc package it has successfully installed the packages and it checked & has installed the required dependent packages as well.
Local Yum Repository

Enjoy...!!
Let me know if you have any queries related how to create local yum repository in Linux.

Learn How to install Linux In Virtual Box

Comments

Popular posts from this blog

Upgrade Oracle Database 12c to 19c by DBUA Method

  Introduction Upgrade Oracle Database is a crucial step to ensure you're benefiting from the latest features, performance enhancements, and security updates. In this guide, we'll walk you through the process of upgrading your Oracle Database 12c to the latest version, 19c . Follow these steps to ensure a smooth and successful upgrade Environment Hostname : prod.infoinflux.com Database Name : PROD DB VERSION : 12.2.0.1.0 ORACLE_BASE : /u01/app/oracle DB Home Path : /u01/app/oracle/product/12.2.0.1/db_1 Datafile Location : /u01/app/oracle/oradata/PROD Target DB VERSION : 19.0.0.0 Target DB Path : /u01/app/oracle/product/19c/db_1 Upgrade Method : Database Upgrade Assistant Steps For upgrade using Database Upgrade Assistant (DBUA): Take Latest Database backup Make Directory for 19c Home Download and Unzip Software to 19c Home Directory Install 19c Binary or Software Create Pre and Post Upgrade Scripts Run Pre-Upgrade Script Pre-Upgra...

Install Oracle Linux 6 or any version in VM Virtual Box

 1. Download & Install Oracle Linux from the Link: https://www.oracle.com/in/virtualization/technologies/vm/downloads/virtualbox-downloads.html 2. Download any ISO file from the link: https://yum.oracle.com/oracle-linux-isos.html I have downloaded 6.8 version iso 3. Let’s create the Linux machine using the same ISO. Click on New for creating new virtual machine. 4. Now Put Name and create a folder naming PROD or any other name as per your requirement. In my case my system D drive has enough of space, so I created a folder naming PROD and download the ISO image in same drive. I have Selected ISO image which I downloaded. Note: Make sure you select Skip Unattended Installation. Click Next. 5. I have 16 GB ram in my system so I am giving 4 GB(4096 MB), you can gives as per your system resources. Click Next 6. Now give Hard disk size you want to assign to your machine. Select pre-allocate Full Size. Click Next. 7. It wi...

Install Oracle Database 12.2(12c) on Linux

  Introduction Installing Oracle Database 12.2 on Linux system might seem daunting at first, but with the right guidance, it can be a smooth process. In this guide, we'll take you through the step-by-step procedure to install Oracle Database on a Linux environment. By the end of this tutorial, you'll have a functional Oracle Database instance up and running. Steps for Installation: 1. Prerequisites Automatic Setup 2. Prerequisites Manual Setup 3. Install Oracle Database Binary (Software only) 4. Create Database by DBCA 1. Prerequisites Automatic Setup To perform all your prerequisite setup automatically, issue the following command or you can proceed with manual setup explained in 2nd point. [ root @ prod ] # yum install oracle - database - server - 12cR2 - preinstall - y 2. Prerequisites Manual Setup a) Download and Unzip the oracle 12.2 Setup Download or copy the oracle setup file to any location as per your requirement. In...

Primary & Standby Database SYNC Check in Oracle Database

 In Oracle Data Guard , you can check whether the standby database is in sync with the primary database by monitoring the apply lag. The apply lag represents the time delay between when a redo log is generated on the primary database and when it is applied on the standby database. A zero or low apply lag indicates that the standby is relatively up-to-date with the primary, while a high apply lag suggests a potential synchronization delay. Here are some methods to check whether the standby database is in sync with the primary: 1. Data Guard Broker If you are using the Data Guard Broker, you can use the DGMGRL command-line interface or Enterprise Manager (Grid Control) to check the status of the Data Guard configuration and monitor the apply lag. For example, using DGMGRL: DGMGRL> SHOW DATABASE 'standby_database_name' APPLY_LAG; DGMGRL > SHOW DATABASE 'standby_database_name' APPLY_LAG ; 2. V$DATAGUARD_STATS View On the primary datab...

ORA-12012: error on auto execute of job SYS.ORA$AT_OS_OPT_SY_**

  Introduction ORA-12012 error is related to Oracle Database and is part of the Oracle Job Scheduler (DBMS_SCHEDULER) . It usually occurs when an automatic task or job execution encounters an issue. The error message you're seeing, " ORA$AT_OS_OPT_SY_<number> ," is specific to the job causing the problem. During the 12c database creation process, you can see ORA-12012 error in the alert log file when the “ SYS.ORA$AT_OS_OPT_SY_ ” auto job runs. To fix the error, it is necessary to drop the job and recreate it. Errors will be as follows. Errors in file /u01/app/oracle/diag/rdbms/prod/PROD/trace/PROD_j000_14524.trc: ORA-12012: error on auto execute of job "SYS"."ORA$AT_OS_OPT_SY_767" ORA-20001: Statistics Advisor: Invalid task name for the current user ORA-06512: at "SYS.DBMS_STATS", line 47207 ORA-06512: at "SYS.DBMS_STATS_ADVISOR", line 882 ORA-06512: at "SYS.DBMS_STATS_INTERNAL", line 20059 ORA-065...

Install Oracle 19c Database on Linux

  Introduction Installing Oracle Database 19c on a Linux system might sound complex, but with a well-structured approach, it can be a smooth process. In this guide, we'll break down the installation steps into simple and easy-to-follow instructions, ensuring you set up or install Oracle 19c successfully on your Linux machine. Steps for Installation: 1. Download 19c Software & Copy it to Location 2. Prerequisites Automatic Setup 3. Prerequisites Manual Setup 4. Install 19c Oracle Database Binary (Software only) 5. Create Database by DBCA 1. Download 19c Software & Copy it to Location a) Download 19c Software on local system: Click here b) Transfer or copy Setup file using WinSCP or Mobaxterm on Linux Machine at any location as preferred. In my case I have copied to /u01 mount. c) Give chmod 775 permission to the setup file. [root@prod u01]# ls 19C_DB.zip [root@prod u01]# chmod 775 19C_DB.zip [ root @ prod u01 ]# ls 19 C_D...

RAC Database Shutdown Procedure

  Introduction When it comes to managing an Oracle Real Application Clusters (RAC) database, proper shutdown procedures are crucial to maintain data integrity and prevent potential issues. In this short blog post, we'll guide you through the step-by-step process of shutting down an Oracle RAC DB in sequence using commands, ensuring a smooth and safe shutdown. How to Shutdown Oracle Real Application Clusters Database ? Shutdown Oracle Listener. Shutdown RAC Database Instances on all nodes. Shutdown ASM instances from all nodes. Shutdown Node applications on all nodes. Shut down Oracle Clusterware / CRS. 1. Shutdown Oracle Listener ## To stop listener from all nodes ## [ grid @ node1 ~ ] $ srvctl stop listener ## To Check Status of listener ## [ grid @ node1 ~ ] $ srvctl status listener Listener LISTENER is enabled Listener LISTENER is not running on node ( s ): node1 , node2 ## OTHER COMMANDS ## ## To...

RMAN Backup using ShellScript

 In a real time, we will not take Oracle database backup manually everyday. Some of the tasks can be automated like RMAN backups. In this post, we will see how to automate RMAN backup using shellscript and I personally use shellscript for import/export, rman backup and for monitoring alerts. • Create Backup directory • Create RMAN backup script file .sh • Schedule Backup Under Crontab # Example of job definition: # .---------------- minute (0 - 59) # | .------------- hour (0 - 23) # | | .---------- day of month (1 - 31) # | | | .------- month (1 - 12) OR jan,feb,mar,apr ... # | | | | .---- day of week (0 - 6) (Sunday=0 or 7) OR sun,mon,tue,wed,thu,fri,sat # | | | | | # * * * * * user-name command to be executed # Example of job definition: # . ---------------- minute ( 0 - 59 ) # | . ------------- hour ( 0 - 23 ) # | | . ---------- day of month ( 1 - 31 ) # | | | . ------- month ( 1 - 12 ) OR jan , feb , mar , apr .....

ASM Disks Migration from Old storage to New storage on RAC

 Check Number of Disk Groups SQL> select name,path, total_mb, state, mount_status, header_status from v$asm_disk; NAME                      PATH                            TOTAL_MB   STATE   MOUNT_STATUS HEADER_STATUS --------------   ------------------------------      ----------     --------      --------------         ------------ DATA_0000      /dev/oracleasm/disks/DATA      225264    NORMAL      CACHED                MEMBER FRA_0000        /dev/oracleasm/disks/FRA          92160    NORMAL      CACHED                MEMBER CRS_0000      ...