Introduction
Installing Oracle Database 19c on a Linux system might sound complex, but with a well-structured approach, it can be a smooth process. In this guide, we'll break down the installation steps into simple and easy-to-follow instructions, ensuring you set up or install Oracle 19c successfully on your Linux machine.
Steps for Installation:
- 1. Download 19c Software & Copy it to Location
- 2. Prerequisites Automatic Setup
- 3. Prerequisites Manual Setup
- 4. Install 19c Oracle Database Binary (Software only)
- 5. Create Database by DBCA
1. Download 19c Software & Copy it to Location
- a) Download 19c Software on local system: Click here
- b) Transfer or copy Setup file using WinSCP or Mobaxterm on Linux Machine at any location as preferred. In my case I have copied to /u01 mount.
- c) Give chmod 775 permission to the setup file.
[root@prod u01]# ls
19C_DB.zip

[root@prod u01]# chmod 775 19C_DB.zip
2. Prerequisites Automatic Setup
To perform all your prerequisite setup automatically, issue the following command if the machine has internet access or you can proceed with manual setup explained in 3rd point.
[root@prod]# yum install -y oracle-database-preinstall-19c3. Prerequisites Manual Setup
a) Put a full hostname for the server in /etc/hosts file.
<IP-address> <full-host-name> <machine-name>

b) Add the following lines to the /etc/sysctl.conf file
fs.file-max = 6815744
kernel.sem = 250 32000 100 128
kernel.shmmni = 4096
kernel.shmall = 1073741824
kernel.shmmax = 4398046511104
kernel.panic_on_oops = 1
net.core.rmem_default = 262144
net.core.rmem_max = 4194304
net.core.wmem_default = 262144
net.core.wmem_max = 1048576
net.ipv4.conf.all.rp_filter = 2
net.ipv4.conf.default.rp_filter = 2
fs.aio-max-nr = 1048576
net.ipv4.ip_local_port_range = 9000 65500Run the following commands to change the current kernel parameters.
/sbin/sysctl -p
c) Add the following lines to a file called /etc/security/limits.conf
oracle   soft   nofile    1024
oracle   hard   nofile    65536
oracle   soft   nproc    16384
oracle   hard   nproc    16384
oracle   soft   stack    10240
oracle   hard   stack    32768
oracle   hard   memlock    134217728
oracle soft memlock 134217728d) Install Required Packages
The following packages are listed as required, including the 32-bit version of some of the packages. Many of the packages should be installed already. If you don't have internet in the machine in that case you can create local yum repository in linux to install these packages.
yum install bc -y
yum install binutils -y
yum install compat-libstdc++-33 -y
yum install compat-libstdc++-33.i686 -y
yum install dtrace-utils -y
yum install elfutils-libelf -y
yum install elfutils-libelf-devel -y
yum install gcc -y
yum install gcc-c++ -y
yum install glibc -y
yum install glibc.i686 -y
yum install glibc-devel -y
yum install glibc-devel.i686 -y
yum install ksh -y
yum install libgcc -y
yum install libgcc.i686 -y
yum install libstdc++ -y
yum install libstdc++.i686 -y
yum install libstdc++-devel -y
yum install libstdc++-devel.i686 -y
yum install libaio -y
yum install libaio.i686 -y
yum install libaio-devel -y
yum install libaio-devel.i686 -y
yum install libXext -y
yum install libXext.i686 -y
yum install libXtst -y
yum install libXtst.i686 -y
yum install libX11 -y
yum install libX11.i686 -y
yum install libXau -y
yum install libXau.i686 -y
yum install libxcb -y
yum install libxcb.i686 -y
yum install libXi -y
yum install libXi.i686 -y
yum install make -y
yum install net-tools -y
yum install nfs-utils -y
yum install smartmontools -y
yum install sysstat -y
yum install targetcli -y
yum install unixODBC -y
yum install unixODBC-devel -y
yum install zlib-devel -y
yum install zlib-devel.i686 -ye) Create new groups, users & directories
groupadd -g 5001 oinstall
groupadd -g 5002 dba
groupadd -g 5003 oper


useradd -u 5007 -g oinstall -G dba,oper oracle
usermod -g oinstall -G dba,oper oracle


##set password of oracle by##

passwd oracle


##Create Directories and Give Permissions##

mkdir -p /u01/app/oracle/product/19c/db_1
chown -R oracle:oinstall /u01
chmod -R 775 /u01f) Stop and Disable Firewall
You will need to stop and disable the firewall or configure it. To disable it, do the following.
systemctl stop firewalld

systemctl disable firewalld

systemctl status firewalldOr just type setup in terminal it will open Setup utility & navigate through System services to disable firewall
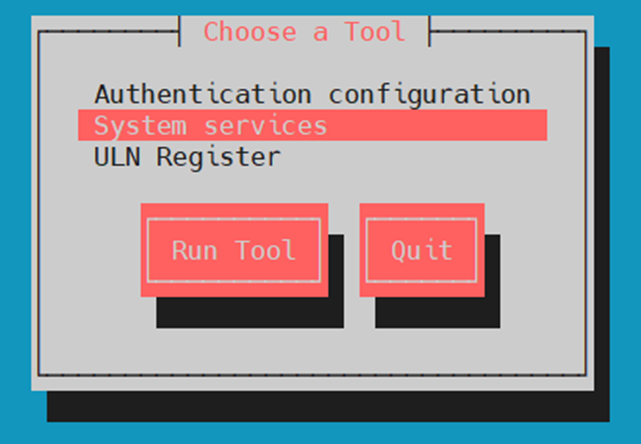
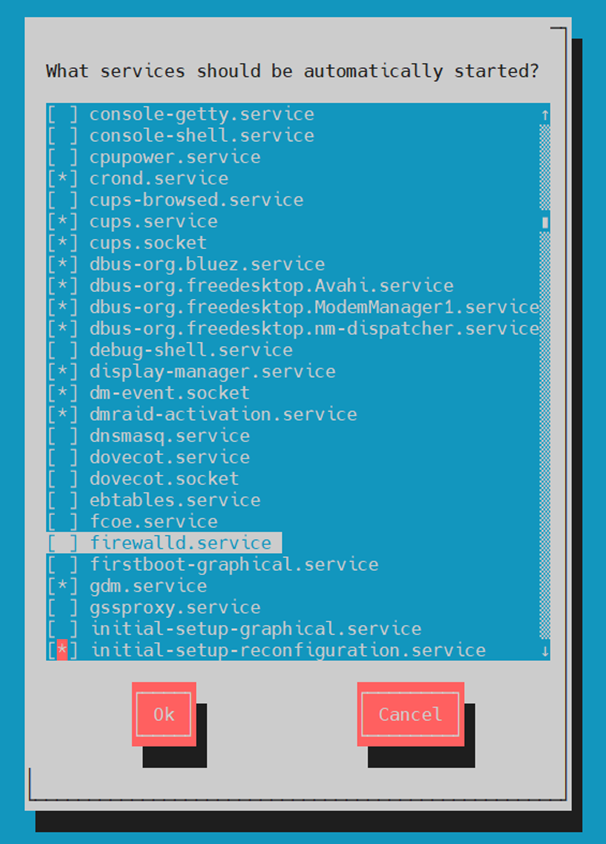
g) Set secure Linux to permissive by editing the /etc/selinux/config file
SELINUX=Permissive
[root@prod ~]# cat /etc/selinux/config

# This file controls the state of SELinux on the system.
# SELINUX= can take one of these three values:
#     enforcing - SELinux security policy is enforced.
#     permissive - SELinux prints warnings instead of enforcing.
#     disabled - No SELinux policy is loaded.
SELINUX=permissive
# SELINUXTYPE= can take one of three values:
#     targeted - Targeted processes are protected,
#     minimum - Modification of targeted policy. Only selected processes are protected.
#     mls - Multi Level Security protection.
SELINUXTYPE=targetedOnce the change is complete, restart the server or run the following command.
# setenforce Permissive
h) Login with Oracle user and add below entries .bash_profile
#Oracle environment settings

export TMP=/tmp
export TMPDIR=$TMP
export HOSTNAME=prod.infoinflux.com
export ORACLE_HOME=/u01/app/oracle/product/19c/db_1
export ORACLE_SID=PROD
export PATH=$ORACLE_HOME/bin:$PATH
export ORACLE_BASE=/u01/app/oracle
export LD_LIBRARY_PATH=$ORACLE_HOME/lib:/lib:/usr/lib
export CLASSPATH=$ORACLE_HOME/JRE:$ORACLE_HOME/jlib:$ORACLE_HOME/rdbms/jlibi) Login with Oracle user and unzip the setup file to 19c home directory
[oracle@prod u01]$unzip 19C_DB.zip -d /u01/app/oracle/product/19c/db_1Now Manual prerequisites are completed
4. Install Oracle Database Binary (Software only)
Go to software extracted location and run the run installer
Run from Oracle User:
[oracle@prod ~]$ cd /u01/app/oracle/product/19c/db_1
[oracle@prod db_1]$ ./runInstaller
Launching Oracle Database Setup Wizard…
Follow the Screens below in Slides:
[metaslider id="1694"]At the end of software installation it will ask to run the mentioned scripts from root user
Root Scripts
=========
/u01/app/oraInventory/orainstRoot.sh
/u01/app/oracle/product/19c/db_1/root.sh


Run the Scripts from root user
=====================
[root@prod ~]# /u01/app/oraInventory/orainstRoot.sh
Changing permissions of /u01/app/oraInventory.
Adding read,write permissions for group.
Removing read,write,execute permissions for world.

Changing groupname of /u01/app/oraInventory to oinstall.
The execution of the script is complete.


[root@prod ~]# /u01/app/oracle/product/19c/db_1/root.sh
Performing root user operation.

The following environment variables are set as:
    ORACLE_OWNER= oracle
    ORACLE_HOME=  /u01/app/oracle/product/19c/db_1

Enter the full pathname of the local bin directory: [/usr/local/bin]:
   Copying dbhome to /usr/local/bin ...
   Copying oraenv to /usr/local/bin ...
   Copying coraenv to /usr/local/bin ...


Creating /etc/oratab file...
Entries will be added to the /etc/oratab file as needed by
Database Configuration Assistant when a database is created
Finished running generic part of root script.
Now product-specific root actions will be performed.
Oracle Trace File Analyzer (TFA - Standalone Mode) is available at :
    /u01/app/oracle/product/19c/db_1/bin/tfactl

Note :
1. tfactl will use TFA Service if that service is running and user has been granted access
2. tfactl will configure TFA Standalone Mode only if user has no access to TFA Service or TFA is not installed
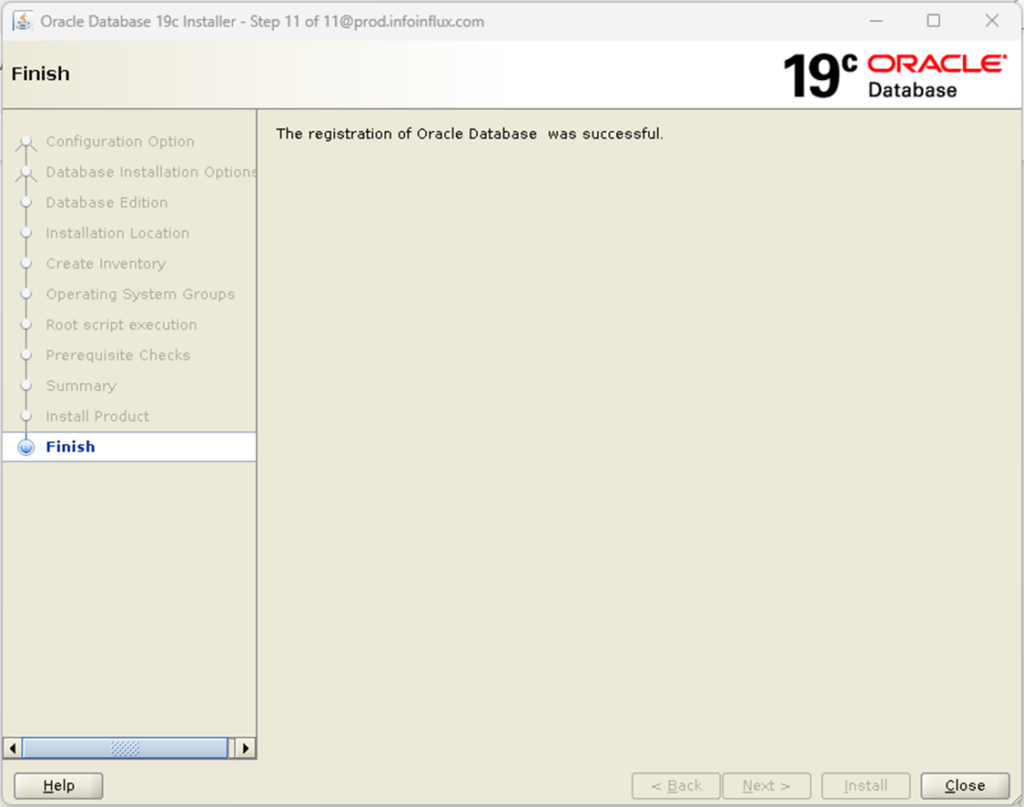
Oracle Software or Binary Installation is completed successfully.
5. Create Database by DBCA
Now We will create a database with DBCA. Type dbca from oracle user or type $ORACLE_HOME/bin/dbca
[oracle@prod ~]$ dbca
or
[oracle@prod ~]$ $ORACLE_HOME/bin/dbca
Follow the Screens below in Slides:
[metaslider id="1725"]Validate Installation
PMON Process
==========
[oracle@prod ~]$ ps -ef|grep pmon
oracle   16865     1  0 14:31 ?        00:00:00 ora_pmon_PROD
oracle   17252  2961  0 14:32 pts/0    00:00:00 grep --color=auto pmon


TNS/ Listener
===========
[oracle@prod ~]$ ps -ef|grep tns
root        23     2  0 13:10 ?        00:00:00 [netns]
oracle   14549     1  0 14:21 ?        00:00:00 /u01/app/oracle/product/19c/db_1/bin/tnslsnr LISTENER -inherit
oracle   17258  2961  0 14:32 pts/0    00:00:00 grep --color=auto tns


Set Environment
===============
[oracle@prod ~]$ . oraenv
ORACLE_SID = [PROD] ? PROD
The Oracle base remains unchanged with value /u01/app/oracle


Login
=======
[oracle@prod ~]$ sqlplus / as sysdba

SQL*Plus: Release 19.0.0.0.0 - Production on Mon Aug 28 14:34:34 2023
Version 19.3.0.0.0

Copyright (c) 1982, 2019, Oracle.  All rights reserved.


Connected to:
Oracle Database 19c Enterprise Edition Release 19.0.0.0.0 - Production
Version 19.3.0.0.0

SQL> select Banner from v$version;

BANNER
--------------------------------------------------------------------------------
Oracle Database 19c Enterprise Edition Release 19.0.0.0.0 - Production


SQL> select name from V$database;

NAME
---------
PRODConclusion
Congratulations! You've successfully installed Oracle Database 19c on your Linux system. Remember that this is a simplified guide, so refer to Oracle's official documentation for comprehensive details and troubleshooting. Installing Oracle Database 19c on Linux doesn't have to be intimidating. By following these carefully laid-out steps, you'll be able to set up a working environment and get started with Oracle 19c for your database needs.
Comments
Post a Comment